Showing posts with label how to cook everything. Show all posts

Friday, March 19, 2010

Day of Green, pt 2....the greener side.


For a day I didn't even think of a week ago, there was a lot of work and preparation that went into it. 

First the tots and I made little felt leprechauns... this is the surviving, one, they ripped the beards, pipes and faces off of their own. And then we baked. The tots made a Green Soda Loaf with their babysitter as I ran off to get supplies for the truly sinful part of our Saint Patrick's Day dinner, Chocolate Cupcakes with Minty Green Icing. My babysitter comes once a week so I can have some baby free time to run errands and do yoga... She brings all sorts of activities for them such as this bread recipe. 

Green Bread
4 cups all-purpose flour
4 tablespoon sugar
1 tablespoon baking soda
1 teaspoon salt
2 tablespoons oil
1 3/4 cup of milk
1 lemon
1 egg
Green food coloring (optional)

Mix milk and the juice of one lemon and set aside to rest for 5 minutes. Mix flour, sugar, soda, and salt with dough attachment in Kitchenaid.  Beat egg into milk and lemon mixture.  While the mixer is going, slowly add in milk mixture, oil, and coloring.  Let it knead in the mixer for a few minutes.  Form into two balls, sprinkle on some sugar, cut an x into the tops.  Bake for about 45 minutes at 375 degrees F, or until a knife comes out clean.

The milk and lemon mixture can be replaced with the more traditional buttermilk if you have it on hand.

For the cupcakes I used Mark Mittman's (yup, there he is again, maybe he is my own leprechaun... he keeps popping up) Chocolate Layer Cake with Vanilla Butter Cream Frosting: You will notice I do not spare the butter in my cooking and these recipes are no exception.

Chocolate Cupcakes*
  • 8 tbsp softened butter (1 stick)
  • 2 cups all purpose flour (or cake flour, optional)
  • 3 oz unsweetened chocolate, roughly chopped
  • 1 cup sugar
  • 2 eggs, seperated
  • 1 tsp vanilla extract
  • 2 tsp baking powder
  • 1/2 tsp baking soda
  • 1/2 tsp salt
  • 1 1/4 cups milk
 Preheat oven to 350 F, grease muffin tins and line with paper cups* This is a great job for little hands while you are attending the chocolate.

Melt the chocolate in a double boiler ove the stove on a low heat. Stirring until nearly melted, removed bowl from heat (the chocolate will finish melting on its own). Give a brief stir making the chocolate smooth and velvety.

Using an electric mixer, cream the butter and the sugar until light and fluffy. Add in one egg yoke at a time and continue beating. Add in vanilla and finally the chocolate. Combine in a separate bowl the flour, baking powder, baking soda and salt. Add to the butter mixture alternating with the milk. 

Beat the egg whites until they hold soft peaks and then gently fold into the cake batter. Fill the lined tins and bake for 16-18 minutes or more depending on the size of the tins.

*This recipe made 36 mini cupcakes but will make two 9" layers (bake for 25-30 minutes).

For icing, also adapted from a  recipe in  Mark Bittman's How to Cook Everything.

Minty Green Icing
Vanilla Butter Cream Frosting
  • 8 tbsp softened butter (1 stick)
  • 4 cups confectioner's sugar
  • 4 tbsp milk (6 tbsp)
  • 1 1/2 tsp mint extract (2 tsp vanilla extract)
  • green food colouring (optional)
Add the extract to the milk.
Beat butter in a mixer then add sugar alternating with the milk.  Slowly one drop at a time add in food colouring until the desired colour of green.

Using a bag with a large tip, ice the cupcakes and hand out to all of your friends because you will have way to many to eat!

photos by me, there would be some of them icing but I had to help hold the bags!

thank you to our babysitter Michelle for the Soda bread recipe and my littler leprechauns for all of their hard work and taste testing.

Wednesday, March 10, 2010

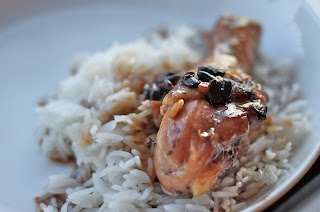
Fermented Black Bean Drumsticks *warning this post is NOT vegetarian friendly*


My children are carnivores at heart. I know this, I accept this, so I do the best I can with this. Such as buying local, hormone & antibiotic free, free run birds. We usually buy whole birds that way we can make stocks and have different cuts, but my children have been showing a preference for the drumsticks. They're easy to hold, they can eat them directly of the leg and are convenient little servings of protein. So I bought a family pack of 12 drumsticks, figuring that I was going to divide them up.... but I didn't and had to cook them all in one go. As it turns out that was fine. Organic birds are usually a bit smaller than their industrially force fed counterparts. So really 2 or 3 legs is a reasonable serving size for two hungry toddlers. The remaining meat can be cleaned of the bone and used for leftovers.

Fermented Black Bean Drumsticks 
(or other chicken parts) 
Adapted from Mark Bittman's How to Cook Everything
  • 1 1/2 tbsp peanut oil
  • 12 drumsticks or about 3 lbs bone in chicken parts, rinsed and pat dry with paper towels
  • 2 tbsp minced garlic
  • 2 tbsp soy sauce
  • 2 tbsp fermented black beans, rehydrated in  just enough water to cover and drained.
  • 1 tbsp honey
  • 1/2 cup water
  • salt & pepper
  • juice of one lemon
While preparing all the ingredients, soak the black beans in water. Heat large lidded skillet on medium heat for a few minutes, add oil  and coat. Add chicken brown quickly on each side. As this is being done drain black beans. *It took me about 3/4 minutes each side. Plenty of time to combine the drained black beans, soy sauce, honey  and water in a bowl.
Turn skillet off and remove from the element. Remove the chicken parts and pour off all but a tablespoon of fat from the pan. Put the skillet back on the element and reheat to medium and add the garlic. Cook garlic until soft, about a minute. 

Add chicken back in, pour combined soy sauce, water mixture over the chicken. Salt and pepper to taste,  turn to coat drumsticks and cover with lid. Reduce heat to medium-low and cook for 20-30 minutes, turning a couple times during the cooking process.

Make rice according to package instructions or your favourite method, this is mine (but I left out the onion and cumin seeds).

Serve over rice, drizzled with the black bean sauce and finish with lemon juice.

photos of carnage by me.

Friday, March 5, 2010

Trussing the bird

My husband laughs at me every time I truss a bird. He says it is because trussing is useless and doesn't do anything (he read that somewhere so now he is the authority) but I think it's because I don't eat meat. So really he is laughing at me manhandeling the fleshy pink rump of a bird and bindings it wings to its chest.

For the trussing I thought I would use Thomas Keller's instruction on 'How to' from his book Ad Hoc At Home. I slipped, twisted and tied, but my bird just did not look like his. So I flipped, bound and tightened again. Still did not look like his. I even got the aid of my three year old, who is an expert in 'reading' pictures.

But alas, I decided to try a new tactic, follow more instructions. This time from my very faithful and dependable mentor- Mark Bittman (he doesn't know this). Somehow his instructions make sense to me and... ta da, my bird looked like this.

Meanwhile on the couch I had another bird baking.


images by me.

Sunday, February 28, 2010

Bake Bittman's Biscotti


I have a small addiction, I can not start my day without a coffee and a biscotti. Often I can't even drink my coffee without having a biscotti to dip. I have been known to drive across town just to get my biscotti fix. I will even brave Saturday morning Granville Island traffic just to get some. 


I get my fix from a place called Terra Breads in the GI public market. For the past almost 10 yrs I have been making a weekly treck to get the double baked cookies for my morning dunks. However the Olympics has thrown a wrench in this and I have been left high and dry as I do not want to contend with the crowds and restrictions imposed on the local market.


Also it has come to my attention, I have never really looked at the numbers before, I spend over $40 a month ($480 a year!!!!) on biscotti. Not necessarily the most costly habit, there are much worse, but it is still an expense that I can cut back on. We make our latte's at home why not make my biscotti at home as well?


The tots and I embarked on a baking adventure. Turns out they like a steamed milk and biscotti in the morning too. In the past I have tried several recipes with not much luck. I thought I would give Mark Bittman's from  How To Cook Everything a try using chocolate chunks and anise seed additions.


Biscotti: 
Great for dunking in coffee or dessert wine.
  • 4 tbsp (1/2 stick or 1/4 cup) unsalted butter, softened, plus more for greasing the sheet. 
  • 3/4 cup eggs
  • 2 eggs
  • 1/2 teaspoon vanilla extract or almond
  • 2 1/4 cups flour plus more for dusting the baking sheets.
  • 2 tsp baking powder
  • pinch of salt
  • 1 tsp anise seeds
  • 3/4 chocolate chips or chunks
Preheat oven to 375f. Ready two baking sheets by greasing and lightly flouring, tap out excess flour. 

Cream butter and sugar with an electric mixer until light and fluffy; beat in one egg at a time. Mix all of the dry ingredients including the the anise seeds in a separate bowl. Leave chocolate chunks until the very end of the recipe. Combine the dry ingredients with the butter mixture a little bit at a time until a batter is formed. When fully combined add the chocolate chunks and mix through on a low speed for a couple of turns. You do not have to beat the batter, you just want the chunks evenly dispersed.

Turn dough out and form two logs about 2 inches wide, place one on each sheet and flatten the top slightly. 

Bake for about 30 minutes on a middle shelf and no lower until the top of the logs crack and there is a golden brown colour on the sides and at the base. Remove from oven and lower the temperature to 250f.  When logs are cool enough to handle gently cut (a serrated knife is best) on a diagonal into 1/2 inch slices.

Place the slices back on the sheets and bake an additional 15-20 minutes until dried out. Turn half way through. When done transfer to a cooling rack as soon as you can. But whatever you do, do not leave them unattended with a amped up not napping  three year old in the vicinity!


I'm pretty happy with it, it will do until I can tweak it and make it my own. 


photos by me.

Monday, February 8, 2010

My name rhymes with Vegan.

I was talking to my husband's cousin today; I guess by extension my cousin, and was telling her I eat a mostly vegetarian diet. She is a vegan, so she asked me if I had ever thought I should go vegan? I gave her two answers.
 "The short answer to have I ever thought about it?: A lot of the meals I make for me lean towards vegan, but because of my name I could never have become one. The long: For me personally I try to eat a balanced healthy diet. Sometimes that includes dairy and eggs and bottom feeders (seafood). It was the diet that I developed for myself when I was 16 and it just kinda works for me. I know most of the arguments pro and cons and I have never been truly convinced that veganism is for me. I am a strong believer in the environment (as Jeff and I learn more we have even gotten a bit hippyish), animal rights, nutrition and local food. Even though Jeff and the babies eat meat, I make sure it is hormone and antibiotic free, as well as knowing the source and farm. I drive restaurants crazy because in this day and age I expect them to know where IT comes from. If they don't I don't order it. So that is part of the long answer. I know by definition this does not make me a vegetarian, that is usually why I say a mostly veg diet"
Here is a vegan recipe for my cousin.


Mark Bittman's Simplest Dal, with Celery Root
 from "How to Everything Vegetarian" 
  • 1 cup dried red lentils, washed and picked through
  • 2 tbsp minced peeled fresh ginger
  • 1 tbsp minced garlic
  • 4 cardamon pods (yes they made a huge difference)
  • 2 cloves (also made a difference)
  • 1 tbsp mustard seeds (I used dark)
  • 1 tsp coarsely ground pepper
  • roughly 1 1/2 cups peeled and 1/2" cubed celery root
  • salt
  • 2 tbsp peanut oil (optional)
  • chopped fresh cilantro for garnish.
  • lime wedge


Put all the ingredients up until salt (salt goes in when done),  in a sauce pan large enough to hold everything plus water to cover by an inch and a half. Simmer until Dal is soft about 30 minutes. Add salt and oil when done and check seasoning.

I serve it over cumin flavoured basmati rice, a hefty squeezed of lime juice and garnished with chopped cilantro leaves.

photos by me with help from my assistants, Billie & Elijah.


Saturday, January 23, 2010

An Adventure in Rome...


OK, maybe not. Who can afford airfare these days? And what to do with the kids, give them to a relative or sherpa them around?  Hmm... no, we'll stick to Italian style family meals in our very own home. Maybe for ambience we'll string up some vines and paint a mural on our ceiling.


Romanesco Cauliflower  & Fresh Pasta 


  • One head of Romanesco Cauliflower also called Romanesco Broccoli
  • 2 cloves minced garlic
  • 1 tbsp anchovy paste
  • 3 tbsp olive oil plus some for drizzling*
  • salt & pepper to taste
  • 1/4 cup grated pecorino cheese plus more for garnish**
  • chili flakes (optional)
  • flat leaf parsley for garnish
  • lemon wedges


For fresh pasta- Recipe from Mark Bittman's 'How to Cook Everything'
Use only half of the yield for this dish.
  • 2 cups organic un-bleached flour (I used one cup white & 1 cup whole wheat from a local grain CSA)
  • 1 tsp salt
  • 2 lg eggs, 3 egg yolk
  • water if needed
I'm cooking for kids so speed is essential. I have tried to make pasta dough on the counter with a well in the centre of my flour for the eggs and never had much success with it.  I am sure it is touch and practice and one day when I have time I may try it again but for now I will stick to the food processor.


Put flour and salt in a food processor, pulse a couple times to combine. Add eggs and yokes, pulse for an additional 30 secs or until a ball forms. If it is dry add some water slowly, if wet add a bit more flour, a tiny bit at a time.

Wrap in plastic and rest for 30 minutes in the fridge or longer. Can stay there for up to 24 hrs. Then process dough with a pasta machine. Unlike an Italian grandmother I have never been able to roll it out and form little shapes. I use a Kitchen Aid to form sheets then roll it up to cut long strands.

For Sauce:

Cut cauliflower into florets, parboil for 2 mins in a large pot of water (big enough to cook pasta), drain and shock them in cold water. Reserve. Meanwhile keep water at a boil and cook pasta.

In a large fry pan heat olive oil on medium heat. Cook garlic, anchovy paste and chili flakes if using, until you can smell the paste and the garlic is soft, roughly a minute.  Add the cauliflower florets cook for a few minutes more. When pasta is done add the noodles to pan, the cheese and drizzle with enough olive oil so that the noodles do not stick to the pan. Toss mixture and check seasoning.

At the table either just before serving or on individual plates, grate more cheese over top noodles, drizzle with more olive oil and garnish with parsley, fresh pepper and lemon wedge.

*I have a cooking olive oil and a higher quality one for drizzling at the table.
**We use  a microplane grater for our cheese so it is very light.


photos by Jeff.

LinkWithin

Related Posts with Thumbnails

Tomatoes and more: Find more recipes here!