Showing posts with label pass it on. Show all posts

Thursday, June 17, 2010

Week 9 Pass it On: Lentil and Spinach Soup

Make sure enter my giveaway for an awesome food package of  Vancouver British Columbian treats Here!


This past week has been a bit gray, not quite rainy and not quite warm so I was inspired to make a soup from the Food Revolution's chapter Simple Soups. For those who are not familiar with the pass it on premises. I am making one recipe (sometimes two if it is a matching veg) from Jamie's Food Revolution. A cook book that focusses on delicious recipes that anyone from the the novice to the  experienced home cook can make! The aim is to get more people cooking at home, eating better and learning about food. At the beginning of the book Jamie Oliver challenges his readers to make one recipe from each chapter and then pass it on. So I am passing it on to my food community. Enjoy, make & share!

I really enjoyed this soup, but I enjoyed it more the next day. The flavours had time to meld together and become more complex. Either immediately or later this is a warm hearty soup for less than stellar days. It also makes good use of staples and and fresh in season veggies (all you CSA people, who get a good share of spinach this one is for you).


Lentil and Spinach Soup
  • 2 carrots, peeled & diced
  • 2 celery stalks, diced
  • 2 medium onions, peeled & roughly chopped
  • 2 cloves of garlic, peeled & sliced
  • 1 3/4 quarts stock, chicken or veg (2 litres)
  • olive oil
  • thumb size piece of ginger, peeled & finely chopped
  • 1/2-1 fresh chile to taste, seeds removed & sliced
  • 10 cherry tomatoes, cored & halved
  • 2 cups red lentils (or another variety that prefer, but you may have to adjust cooking times)
  • 7 cups fresh spinach, torn of large
  • 1 whole lemon, juiced plus more to serve (not in Oliver's recipe but trust me!)
  • 1 cup natural yoghurt
Get the first four ingredients ready, then in a separate pot bring your stock to a boil, keeping hot, set aside.

In a lage sauce pan on medium heat, warm approximately 2 tbsp of olive oil. Add carrot, celery, onions & garlic, cook with lid slightly skewed for about 10 mins or until the veg is soft but still holding together.

Meanwhile get ginger, chile and tomatoes ready.

Add boiling broth, lentils (I used whole red lentils that doubled my cooking time), ginger and chile to the sauce pan with the veg. Bring to a boil and reduce to simmer. Cook with the lid on until the lentils are done.

Add the spinach cook for another 30 seconds. Season with salt & pepper and the juice of one lemon.

You can either serve it as is or use an immersion blender to make it smoother. Serve with a dollop of yoghurt, freshly diced chile and a wedge of lemon.

Serves 6-8 (as if, I will be eating it for weeks)

Pass it on to your friends and families.... and if you blog about it link it to my blog!
(hmm- not getting my link to work, check back for it)

photos by me.

Monday, June 7, 2010

Week 8: Time to Pass it on!


Weeks ago I started cooking one recipe from Jamie Oliver's most recent book Jamie's Food Revolution and as per his request of his readers I thought I would pass that recipe on to my community. This weeks recipe comes from Kick-Start Breakfasts at just the right time; we ran out of granola.

In our home granola is almost exclusively known as breakfast. There is no need to ask our 4 yr son "what do you want?", breakfast always is granola, yoghurt and milk. We spend nearly $12 a week on gourmet granola but recently we have been looking for ways to cut back. And things like Granola, Biscotti and Bread are simple enough, cheaper than and usually better than store bought. That is why this week's pass it on is:

Granola
  • 2 cups rolled oats (not instant)
  • 1 cup mixed nuts (I used, walnuts, pistachios, cashews & hazelnuts, all left over from other baking projects), large nuts coarsely chopped
  • 1/4 cup mixed seeds (I used, sesame & pumpkin, also left over from other projects)
  • 3/4 cup unsweetened shredded coconut (personally can't stand the stuff so I skipped it)
  • 1 tsp ground cinnamon
  • 1 1/2 cups dried fruit (I used cranberries & raisins but your imagination is the limit)
  • 5 tbsp maple syrup or honey (75 ml)
  • 5 tbsp olive oil (75 ml)
  • pinch of salt
 Preheat oven to 350F, gather the components. On a large baking sheet assemble the dry ingredients (excluding dried fruit), cinnamon, coconut, and pinch of salt. Drizzle maple syrup & olive oil over the dry mixture. Mix to combine everything evenly then spread out flat on the baking sheet. Bake for 5 minute intervals. Remove from oven, stir, mix and re-spread between each interval. Coarsely chop large dried fruit such as apricots while baking. Bake 25-35 mins. Mine took 25 minutes until a nice dry golden brown. Remove from oven and add the dried fruit. Let cool and pack into an air tight container.

By my estimate this is about $6 worth of granola that I made for less than half of that. I still buy my ingredients from the best sources that I can, so I can safely say that my son will still get his fancy schmancy gourmet granola.

As always if you make this recipe or share it, let me know about it and link your blog up to mine! I would love to see others pass it on. Or if you have another recipe that is simple delicious and will make others cook share that too.


Hey What's For Dinner


For more meatless dishes go over to hey whats for dinner mom? for meatless monday ideas!


Thursday, May 13, 2010

Week 7 Pass it On! Sweet Things.


We had a BBQ the other night, the first of the year... Even though we have had mild temperatures all winter and spring long it  hasn't exactly translated into glorious warm weather yet. It has been a tease, warm cloudy drizzly days and cool clear ones, not quite sitting outside weather. We have had a bit of turn around this week, clear weather, warmer temperatures and a visit from a friend... To honour that I made a dessert for this weeks pass it on from Jamie's chapter Sweet Things.

I had high hopes for this dessert, just like the weather all spring long it just didn't quite do what I expected. I would not say it was a flop completely but I will say that it didn't stand up to my expectations literally. It was a kinda a runny gooey mess that tasted fabulous!


Help! let us out!

Here is the recipe for this weeks pass it on, remember to try it, blog about it, pass it on to your family and friends and link it to my blog to if you do... Maybe you will have luck than me (but I have some helpful hints to ensure that you do)!

Each step took minutes to make, but there was a longer setting time between each, something to account for, making it a great recipe for a party. You can make the crust, do other things, you can make the filling do other things and when you have an extra minute make the topping! The total active time was about half an hour, minimum resting/setting time 2 hrs but more if you have the time.

Vanilla Cheesecake With a (Rasp)Berry Topping
(I used Strawberries, Adapted From Jamie's Food Revolution)
  • 13 Tbsp, butter divided, plus extra for greasing
  • 1 cup rolled oats (not instant)
  • 2 cups graham crackers crumbs
  • 1 vanilla bean or  1 tsp extract
  • 3 X 8 oz bars of cream cheese
  • 3/4 cup super fine (berry) sugar
  • 1 lemon, zest & juice
  • 1 orange, zest
  • 1 1/4 cups heavy cream
Berry Topping
  • 1/2 cup super fine (berry) sugar
  • 4 cups raspberries or other fruit, (roughly chopped)
A couple of important notes that I will start off right away, in my quest to do most things natural and local etc, etc and so on I used an organic cream cheese from a local producer, this cheese was too soft! And or the recipe called for too much cream, I have not figured out which. Also my local Whole Foods did not have graham cracker crumbs, or even regular crackers. The choices where store brand graham bears or gluten free crackers. As none of us eating had any specific allergies I opted for the bears. As for the berries I used Strawberries to keep things relatively affordable, california strawberries are coming north by the truck load as we have no local berries right now!

First things first if you were unable to find graham cracker crumbs, make them yourself by bashing, rolling or smashing them. It was slightly theraputic crushing the little bear crackers.

The base- Grease a 9 in springform pan with butter. Put a sauce pan on medium low heat and toast the rolled oats until they are darker in colour, turn down heat to (a bear) low, add your butter and cracker crumbs, stir until everything is mixed and butter is melted. Remove from heat, spoon the mixture into the base of the springform pan, pat down to create a level packed base and let cool for an hour in the refrigerator.

The Filling- I used a teaspoon of vanilla extract so I skipped this step but, cut your vanilla bean open length wise, scrape your knife along the inside to remove the seeds and put them in the bowl with your cream cheese, sugar, lemon zest, juice and orange zest and combine. In a separate bowl whip the cream until soft peaks form. Gently fold half of the cream into the cream cheese mixture and then the other half. Once it all blended spoon over the base and let set for an hour (or more)


For the topping, macerate your berries along with the sugar, hands are best. The Strawberries I roughly chopped them first put them in a bowl dumped the sugar over top and then  squished them through my hands.

To serve, remove the cheesecake from the springform pan by gently running a blade along the inside to loosen the cheese away from the pan. Open the pan and put it on a serving platter. Spread the berry mixture over top or spoon over individual servings.

My friends and family LOVED the flavour of this cheesecake even though I was disappointed in the outcome. My cheese was too soft making the thing too soft and it was kinda a flop... a big flop... I am still cleaning the melted cheese from the patio table.

photos by me.

Remember if you pass this recipe on or if you have another that you want to share just add your link below.

Sunday, May 2, 2010

A little late...Pass it On Week 6


OK OK, I know... I am late, don't yell at me! I know this post is several days overdue and we are nearly onto next week's pass it on, but I have been busy. I opened my etsy store.  I won't bore you with all the details. We'll just say that the children have started staring longingly out the window, hoping someone will throw them scraps.

This weeks pass it on recipe comes from the chapter Easy Curries, be forewarned "easy" does not mean quick.
Vegetable Jalfrezi
I am passing this recipe on  from Jamie's [Oliver] Food Revolution
  • 1 medium onion, halved peeled and roughly chopped
  • 1 fresh red chile, finely sliced
  • thumb sized piece of ginger, peeled and sliced
  • 2 cloves of garlic, peeled and sliced
  • small bunch of fresh cilantro, leaves picked off, and finely slice the stalks
  • 2 red peppers, seeded and roughly chopped
  • 1 cauliflower, remove green leaves, divide into florets, and roughly chop the stalk
  • 3 ripe tomatoes, cored, and 
  • 1 small butternut squash, seeded, thick skin removed, and diced
  • 1 x 15 oz can of garbanzo beans, drained
  • 3-4 peanut/vegetable oil
  • pat of butter
  • 1/2 cup of jalfrezi or other medium curry paste
  • 1 x 28 oz can of diced tomatoes
  • 1/4 cup balsamic vinegar
  • salt & pepper
  • 2 lemons, 
  • 1 cup natural yoghurt
Have all of your ingredients on hand. To save time prepare the whole vegetables except for the cauliflower. 

In a large dish, such as a dutch oven or heavy bottomed sauce pan on medium high heat add the peanut or vegetable oil, the onion, chile, ginger, cilantro. Cook for 10 minutes or until soft and nicely coloured. 

Prepare the cauliflower while the first ingredients are cooking. Open your canned ingredients and drain the beans.

Next add peppers, squash, garbanzo beans, and curry paste. Stir  and coat well. Then add cauliflower, fresh and canned tomatoes (no need to drain), vinegar and one can of water from the empty garbanzo beans. Bring to a boil then turn down to a simmer for 45 minutes. Check at 30 minutes to see if it is too liquid, leave the lid off for the remainder of the cooking time if it is. When the vegetables are tender taste and add just enough salt & pepper, being careful of over seasoning.

Garnish your curry with the cilantro leaves, serve with rice,  a salad, some fresh naan bread, lemon wedges and the yoghurt.

It serves 8, and yes for once Jamie's portions are pretty accurate. I had tonnes left over and my children will no longer starve as I sew myself into oblivion!

Because it had such a long simmer I took that time to make a cucumber salad from the chapter Lovin Salads- These salads are so quick and delicious they really don't need a whole week to themselves. I will just had them in here and there.

Evolution Cucumber Salad.
My tots love cucumber, yoghurt and anything salty.
  • 1 cucumber, peeled and or seeded (I partly peel- and leave the seeds in as we use the long English variety)
  • natural yoghurt
  • olive oil
  • lemon juice
  • salt & pepper
  • mint,chopped
Chop the cukes into bite sized pieces, add a dollap of yoghurt, a generous lug of oil, squeeze of fresh lemon juice, sprinkle with coarse salt and pepper. Mix all things together.

The salad could be done there but because this is an evolving salad you can add some chopped mint (we did) some chopped black olives, and fresh red chile.

food photos by me except for the obvious one of me in an apron, that was done patiently by my husband.


Friday, April 30, 2010

A Fabulous Find and a little preview!

I found this item at our local grocery store while herb shopping. I had seen it a couple times and was highly suspicious and skeptical, but my curiosity got the better of me!
What is it? Well as you can see by the plethora of herbs it is a container for storing herbs in the fridge! Like I said I was skeptical, but these herbs are over a week old and still not showing any signs of deterioration. I usually cut the ends of my herbs put them in a jar and leave in a cool place, they last a few days, the water turns mucky, smelly and I end up throwing out 2/3's of them. I have thought about keeping them in the fridge, but an open jar and toddlers are never a good combination, not to mention absent mindlessly reaching for  the milk and oops.... ce la vie. 

As I can not grow enough herbs to sustain my cooking needs I thought I was doomed to buying $2 bunches every time a recipe called for some. But them after careful debate and throwing at least $5 a week of old used up herbs I thought I would give it a try, I bought the Cuisipro Herb Keeper and I am glad I did so. It works by suspending the herb ends just below the water line with in a closed container. When you want some you just pull up on the top and let the inner liner containing the herbs sit on a lip within the exterior liner. Like I said these particular herbs are going on a week old and I have been using them everyday.

One thing I used my herbs for was my pass it on recipe for the week:

The full recipe will be coming tomorrow! I am little behind on my blog writing. Check out Kitsch in the Kitchen to find out why!

Fabulous Nest Friday inspired by Housewife Bliss

and photos by me.

Thursday, April 22, 2010

Week 5, already? Jamie's Food Revolution: Pass it on.


I think I am going to cheat (yes I know they are my rules, but I am not a rule follower) and present two recipes (well maybe three but one is related to the original recipe as stated by me on my facebook page... you follow me on facebook right?) for week 5 of pass it on.


Just a refresher: How it works is that each week I will be cooking one recipe from each chapter and passing it on to my friends, family and community (that is you). We started it off with Family Roast Dinners then  Quick Pasta for my sister inlaw, Classic Fish, because it is easy and we eat a lot of it around here and then Homely ground Beef, strictly because this chapter scared me. Now we are on to Quick-cooking Meat & Fish and as a bonus Lovin' Salads.

My babies have been sick this week and I honestly didn't know if I was going to get a recipe done, but I wanted to carry on. It had to be quick and easy, something I could do during nap time and in between all the other stuff I have fallen behind on. This is what I chose:

 Fish Baked in a Foil Parcel with Green Beans and Pesto 

The first part is two recipes in one:
  • 2 handfuls of green beans (and peas in the pod*)
  • 2 lemons
  • 2 x 7 ounce chunky fillets, scaled and deboned of firm fish. Jamie calls for salmon but it is halibut season and local!
  • 2 heaped tbsp of pesto (recipe #2)
  • olive oil, salt & pepper.
If you are like me and forgot that you can buy pesto conveniently pre-made at the store to save time, you must make it yourself using all the fresh basil from your garden.

Chopped Pesto
  • 1 clove of garlic
  • lg bunch of basil, leaves & a few smaller stalks
  • sm handful almonds or pine nuts
  • lg handful of freshly grated parmesan cheese
  • extra virgin olive oil
  • 1/2 lemon
  • sea salt & freshly ground pepper
Start mincing garlic, add the the leaves, a couple of stalks, nuts and continue chopping. Put into a bowl, add parmesan cheese, lemon juice, olive oil and salt & pepper! Viola, tragedy adverted and now onto the rest of the recipe.


Tot's version.

Clean the green beans by chopping of the vine end, place on one yard of tin foil folded over to make two layers, place a fillet of fish over top, smear on some pesto, drizzle with olive oil, lemon juice and salt & pepper, fold foil over to close, seal on top and at both ends.

Just before dinner time preheat oven to 400f bake for 15-20 on a baking sheet, check 5 mins before you think fish is done. Let stand for a minute more  before opening up! Done.


To serve, put each packet on a plate open up slowly to allow steam to release, have a couple pieces of grilled bread a slice of lemon and a salad on the side. 

Part 2:
Jam Jar Yoghurt Dressing

I think I will throw a salad recipe in every now and a then, I don't think that Lovin' Salads needs it very own week.

Get a jam jar, put 1/3 cup of natural yoghurt, 2 tbsp of wine vinegar, 1 tbsp olive oil, salt and pepper and shake it up.

* I put peas in my tots packets along with a small amount of green beans. I wanted to include something familiar for them that they enjoy and will not complain about eating. Peas are always a big hit.

Adapted from Jamie Oliver's Food Revolution.

My Fish cost my $25 (fresh halibut- it is in season!), maybe a bit much for what is essentially three servings (tots share a serving and a bit), but the beans about $3, pesto broke down to about $3 of ingredients and everything else was done with what I had at home. We are looking at about $32 for 3-4 servings or $8 a person. Time wise was faster than packing up the tots, getting in a car, picking up daddy from work and going "out" for dinner - Faster still if I had not made my own pesto- 5 mins, 2 mins to make the dressing (that is being generous), about 5 minutes to assemble packages and 21 mins to bake. While dinner was baking, I cleaned all of my cooking dishes (very little), grilled some bread, made a salad and set the table.

There you have it, fast, inexpensive and successful.

Just add your link to the list where it says you are next!

photos by me.


 0 entries so far... you're next!

    1. You are next...
      Click here to enter

    Thursday, April 15, 2010

    This is not your Mother's...?

    Each week I have been making one recipe from Jamie Oliver's book Jamie's Food Revolution and passing it on to my friends, family and fellow food bloggers. I have been asking them to pass it on to their friends, family and so on.... Hoping that we can get people cooking at home again. This week's recipe is a very home style meal.

    First off I am a vegetarian... So this is an unusual meal for me to use as it highlights MEAT and is aptly named MEATLOAF. So why did I choose MEATLOAF?

    First reason is because if I want to cook one meal from each chapter of his book I needed to address his chapter on Beef.  Second just because I have a certain diet doesn't mean that my children should share the same view, they are almost 4, let them decide later on what they want. In the meantime I will cook a mostly vegetarian diet and give them the option to eat what they want. Third and the most fun, is because as a child I hated it (maybe the whole reason why I became a veggie in the first place). An insipid loaf of compressed ground meat, hastily mixed with  dehydrated onion soup mix and saltines, baked and then slathered in a ketchupy tomato sauce. Yum, sounds good doesn't it? Veggie or not, it sounds down right blech.

    The meatloaf dates back to 5th century, the romans had their own version of it, it is related to the Italian meatball and has a very practical application, it makes use of the meat that would normally be chucked. We know it as a convenience food that out parents would pre-make and order us to put in the oven an hour before they got home. This is something different....

    Pot-Roast Meatloaf
    from the chapter Homely Ground Beef
    • 2 medium onions
    • olive oil
    • course salt & freshly ground pepper
    • 1 tsp each ground cumin and coriander
    • 12 plain crackers
    • 2 tsp dried oregano
    • 2 heaped tsp Dijon mustard
    • 1 lb ground beef- organic, grass fed etc, etc....
    • 1 large egg
    • 2 cloves garlic 
    • 1/2-1 fresh hot chile (optional)
    • 1 tsp smoked paprika
    • 2 tbsp Worcestershire sauce
    • 1 15 oz can of chick peas, drained
    • 1 28 oz can of diced tomatoes
    • 12 slices bacon- organic, grass fed etc, etc...
    • 2 tbsp balsamic vinegar
    • 2 sprigs fresh rosemary 
    • 1 lemon
    You can prepare the meatloaf in advance, just put in the fridge covered until needed or if you are making right away preheat the oven to 475 F.

    To make the loaf, finely dice one onion. Heat a pan over medium heat with 2 lugs (his words not mine) of olive oil, sauté onion, pinch of salt and pepper, cumin and coriander. Stir frequently. When soft and nicely golden (not crispy). Remove from heat, and put in a bowl to cool. Take the crackers and bash them up either in a towel or in a mortar and pestle. In the bowl add dried oregano, mustard ground beef, egg and crackers. Combine all ingredients, hands are best! Move to a cutting board and form into a log shape. Rub with more olive oil. Move to an oven safe dish, turn down oven to 400 F and bake for 30 mins.*

    Meanwhile.

    To make the sauce peel the second onion and large dice, peel and slice the garlic and finely chop the hot pepper (optional). Move to a large sauce pan on medium heat with 2 lugs (again his words) of olive oil. Cook for 7 mins, stirring frequently. Add Worcestershire sauce, paprika, chickpeas, tomatoes and balsamic vinegar. Bring to a boil and turn down and simmer for 10 mins. Check for seasoning. The loaf should almost be done!!!

    Finishing up! Remove the needles from the rosemary and place in a bowl. Take the roast from the oven and remove from the dish. Pour the fat over the rosemary and mix up to coat. Put the roast back in the dish and ladle the tomato sauce over  and around the roast, top with slices of bacon and sprinkle the rosemary. Put back in the oven and bake for an additional 15 mins until the bacon is crispy.**

    While the meatloaf is finishing off make a nice green salad!

    To serve, slice up the loaf, ladle on the sauce and add a squeeze of lemon juice.

    Again Jamie Oliver says this will feed 4-6, a full loaf will feed at least six!

    *I made the full recipe but divided it in two and froze half.
    **I baked the loaf with bacon 10 mins and broiled for 5 and it was perfect- my cooking times were slightly altered because I was making a smaller loaf.

    So once again if you blog about this recipe and pass it on to others, share your link with me, or if you have another recipe you wish to pass it on share a link. Leave your link in the comments and I will create a separate link in the body of the text!

    photos by me!

    PS.... Still a veg, I used the delicious yummy sauce & a veggie patty as my meatloaf....

    The meat for this dish cost about $11 and I had everything else in my pantry. Again this recipe start to finish took about 45 mins- that was with making a salad and cleaning my cooking dishes.


    Thursday, April 8, 2010

    Pass it On:Week three.


    There has been some debate and a lot of articles over the merit of celebrity chefs driving a healthy food movement,  I am not talking about the George Forman grill or celebrity endorsements for Weight Watchers, I am talking about real food, real diet and a real change.

    The current subject is Jamie Oliver's Food Revolution and his TV show of the same same name. Oliver goes into and critiques a middle America's elementary school, the town's population, how they eat and how they feed their children. His premise is to teach the town's population to cook good meals, starting off with the school's lunch programme and then going into private homes. Of course the TV show is a little more than that- I have not seen it yet (I don't have cable TV and unless it comes out on DVD or itunes - I may miss it completely). But the idea is a simple one even with all of its critiques, (Oliver is not from the US, he is using big food as a sponsor, he's a celebrity, the chosen medium is television, etc, etc...) teach people to cook one good meal and have them pass it on.

    And then I asked myself, inspired by someone else taking action, what can I do? I can pass it on, by being an example to my children, helping friends and inspiring others. My efforts feel small compared to Jamie Oliver's glitzy reality TV show but why not try?

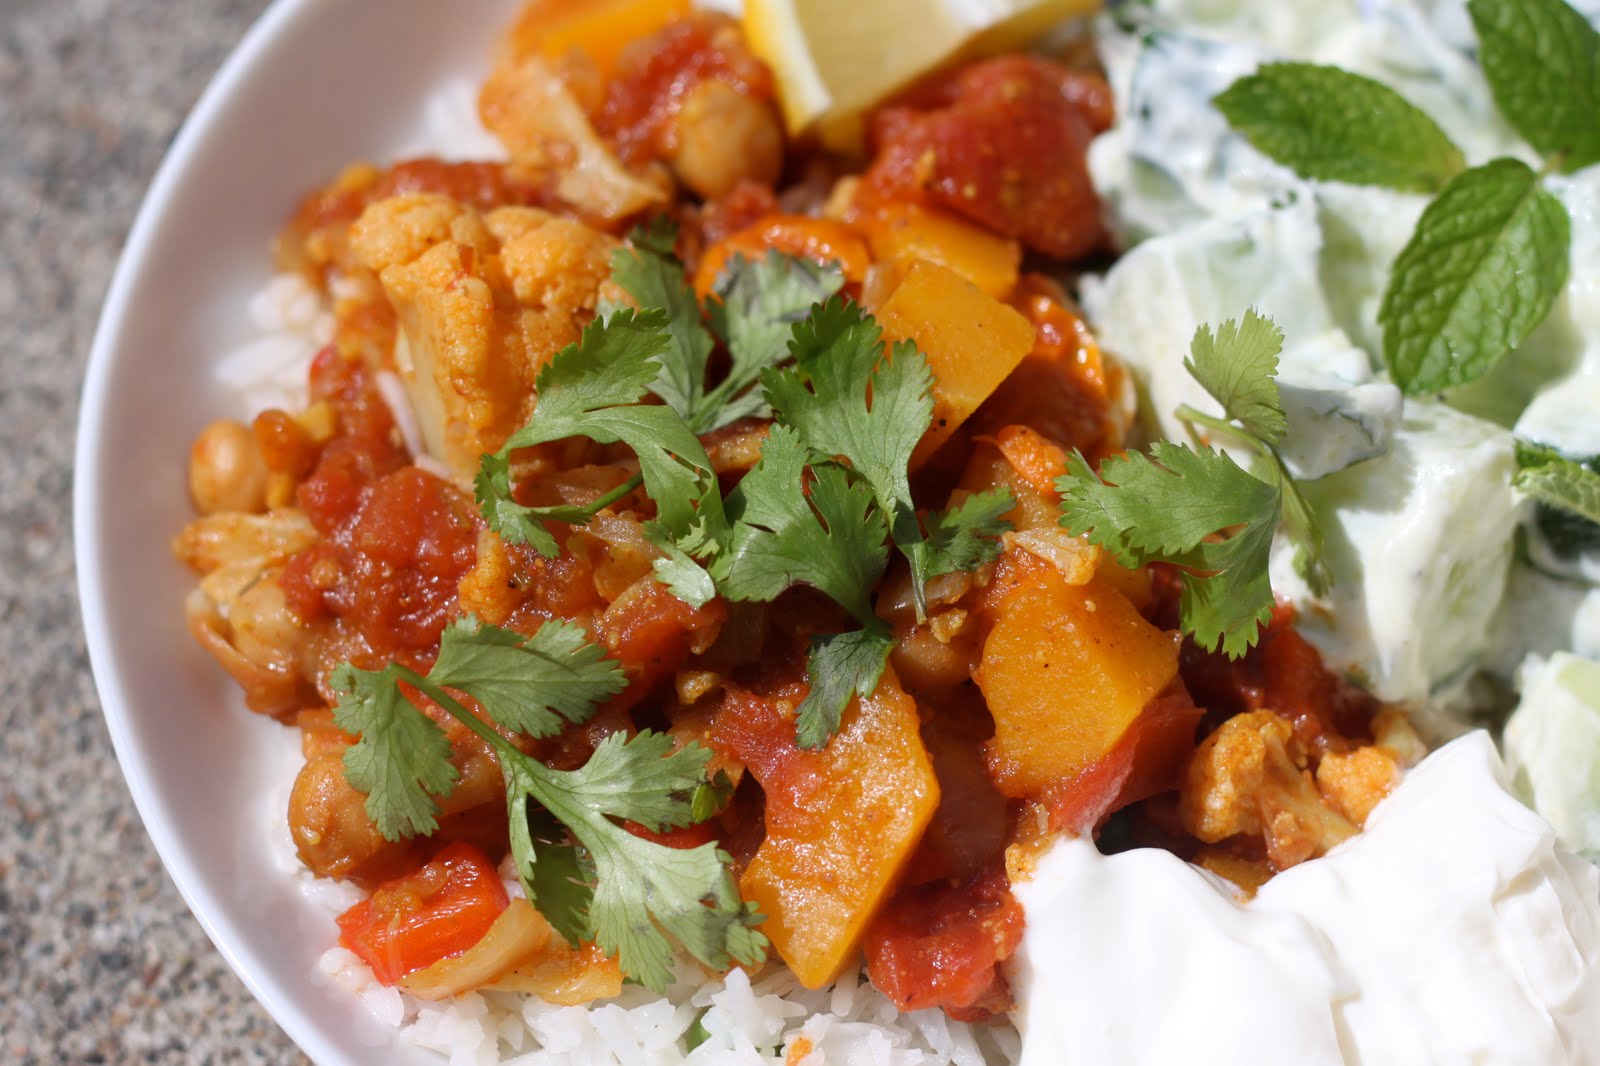
    For the past three weeks I have been cooking one recipe from each chapter of his book. I have chosen each recipe based on either what is in my fridge, or on suggestions or this week what I honestly think my family will eat. I have young children and I want them to be exposed to many different types foods and flavours but still have recognizable components. I involve them in the shopping, preparation and if time and safely allows, the cooking. This I feel prepares them for unexpected presentations and slightly different flavour combinations. This weeks selection is slightly unorthodox for the north American palate but hey, again it is simple, fast and flavourful.

    ps- I am not happy with the photographs but for the sake of illustration they have been included.
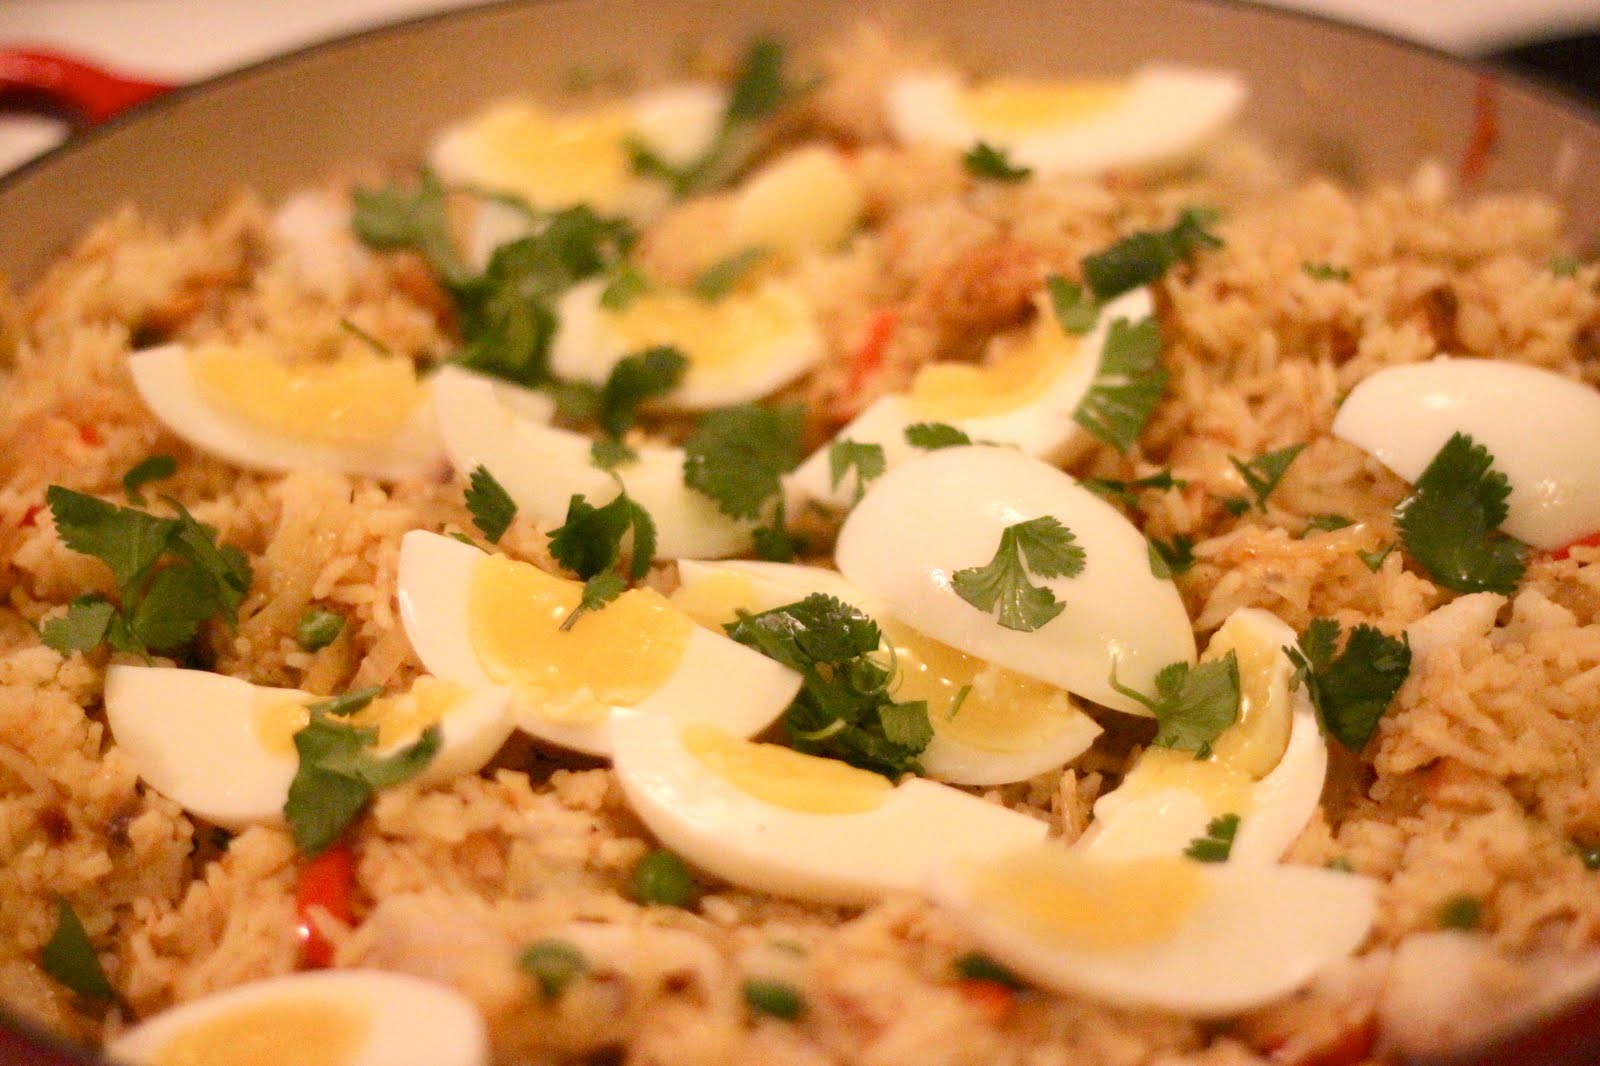
    Kedgeree
    a meal for breakfast or dinner.*
    • coarse salt and fresh ground pepper
    • 1 1/4 cups basmati rice.
    • 3/4 lb white fish fillets for poaching, look for thick firm cuts (most fish mongers will debone and skin for you).
    • 4 large eggs, free range or organic are best.
    • 2 bay leaves (fresh or dried) small bunch of cilantro, and one fresh red pepper (I used a sweet variety)
    • 1 medium onion, halved and peeled.
    • 2 lemons
    • olive oil
    • 2 tbsp of a favourite curry paste.
    • 1/4 lb smoked fish such as trout, salmon, or whitefish, skinned removed.
    • handful of fresh or frozen peas.
    • natural yoghurt to serve.
    To prepare: I like to rinse my rice and soak it before use. Bring two pots of salted water to the boil, one for your rice and one for the poaching, add the bay leaves to the poaching water. Meanwhile remove the leaves from the cilantro and save, roughly chop the stalks, finely slice the pepper if using, cut the onion in half and thinly slice. Cut one of the lemons in half.

    Procede with cooking your rice as per your favourite method. I set the timer  for 15 minutes for my rice, added the fillets and the eggs to the other pot and cooked for 7 minutes. Remove your fish with a slotted spoon, it will flake (remove any skin and or bones if necessary). Chill your eggs in cold water.** Set aside.

    In a large pan heat olive oil over medium and cook your onion, cilantro stalks, peppers and curry paste for 5 minutes. Season with salt and pepper. Finish cooking your rice, flake the smoked fish, peel and quarter the hardboiled eggs. 

    Add the cooked rice, both types of fish and the frozen peas, to the curry paste mixture and combine. Turn down to a low heat, squeeze both halves of the lemon over the mixture, season with salt and pepper, stir once again top with quartered hardboiled eggs and cover with a lid.

    Set your table with the yoghurt and quarter the remaining lemon. Serve in individual plates, sprinkle with the reserved cilantro leaves, yoghurt on the side and a generous squeeze of lemon juice.

    Honestly do not know how much this dish cost, most of the components are from the pantry. The fish was the most expensive thing, costing about $11 for the fillets and smoked salmon. Again start to finish took about 42 minutes. Jamie Olivers says that this recipe serves 4, try 6-8. We have lots of leftovers, that I've already gotten into for breakfast and again for lunch.

    *Kedgeree. A disputed dish of origin.
    ** Chilling your eggs immediately after they are cooked helps suction the membranes to the shells and peel easier.

    photos sheepishly by me.

    Please pass this recipe on, and  if you blog about it share your link with me. Click the red writing below to add your link.


    Thursday, April 1, 2010

    Pass it On: Week Two - Macaroni & Cauliflower Cheese Bake

    Last weekend we took an impromptu trip to Bellingham to see some of the Aunties. Sitting around the table at a our favourite Pizza joint (yes we go out for pizza, this place is special), one of my sisters' in law, was complaining how she doesn't know how to cook  and was describing her diet to us- cheese sandwiches- all the time. As we were staring at her in abject horror imagining kraft single slices between wonderbread she clarified that her favourite cheese was Tillamook's cheddar, but didn't say a word about the bread. So this week's pass it on recipe is for my sister in law, one can not live off of bread and cheese alone (or can they?).

    I chose a recipe based on simplicity and speed that would utilize her favourite ingredient. I also considered cost, quality and quantity (my prices are based on Canadian dollars).

    Start to finish on the table eating it took 42 minutes (I may have lost some time when I sliced my thumb open with an inferior knife), I bought all of the ingredients but ended up halving the recipe.


    Macaroni and Cauliflower Cheese Bake
    This is the full recipe as he wrote it. I halved the pasta, the Parm, and 
    Sour Cream
    • 1/2 a head of cauliflower ($2 for a whole one)
    • 8 oz of Cheddar Cheese ($6.53 the good stuff)
    • 4 oz of Parmesan Cheese (large block $16- about $2 worth)*
    • small bunch of fresh Italian parsley ($1.99- about .50 worth)
    • sea salt & fresh ground pepper
    • 1 lb of dried macaroni pasta ($2.99 for organic 16 oz)
    • 1 cup creme fraiche or sour cream ($3.39 for the local brand sour cream) 

    Total spent at the store $32.90, what dinner cost: $15.67, $3.92 a head.**

    This goes fast so get some salted water on to boil, make sure you are using a large pot that will fit both pasta and cauliflower and a heat proof bowl on top.

    Remove outer leaves of the cauliflower, halve it and break into small florets (save the other half for another recipe!). Slicing the stalk thinly if you want. Set aside

    Grate Cheddar and Parmesan into the heat proof bowl. Finely chop parsley, stalks and leaves set aside.

    Gather remaining ingredients.

    Add macaroni and cauliflower to boiling water and cook as per package directions. Turn the heat down (trust me). Immediately put the heat proof bowl with the cheese over the macaroni and cauliflower. Be aware of the rising steam coming from under the bowl and stir to melt your cheese. If the water boils up over the pot turn the heat down slightly. 

    Stir in the sour cream, add the chopped parsley stalks and all. Season with salt and pepper.

    Carefully remove the bowl from the pot of water and set aside. (You read your pasta cooking instructions right? mine said 10-12 minutes.)  Drain pasta and cauliflower, reserving some of the liquid. Put the macaroni and cauliflower back into the pot. Pour in the melted cheese, mix it all together. If it looks a bit dry add a splash of the reserved liquid.

    You can now eat your Mac/Colflower (my family has an inability to say the word Cauli-Flower) & Cheese if you are starving. If you can wait 5-10 mins more, you can transfer to an oven proof dish and place under the broiler on high. Check every few minutes for a nice brown and crispy top. I used this extra time to make a simple salad, set the table and start on the dishes.


    This was a very simple recipe to make and one that will provide left overs for a a few nights. Jamie says that his full recipe using 1 lb of pasta all the cheese and sour cream will feed 4-6. I used less and it still fed 4 people reasonably sized portions. Plus we have left overs.

    *Jamie called for  4 ounces of parmesan cheese, I only used 2 oz and chose to use Padano instead as it is cheaper. (Tip) I keep both Parmesan Reggiana and Padano in my refrigerator, one for grating and the other for cooking. Padano is half the cost of reggiano but both go a long way.

    **If you buy the full list and plus up the Cheddar cheese you will have enough for two recipes! You can freeze one.

    As always if you pass it on let me know about, if you blog about leave a link bellow. Just click the Red writing to leave your link!

    Lets play!

    photos by me.

    LinkWithin

    Related Posts with Thumbnails

    Tomatoes and more: Find more recipes here!